2. The Builder Environment
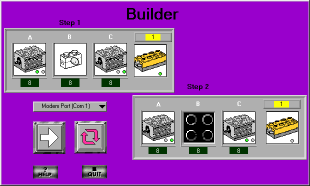
Builder is LEGO Engineer's introductory programming environment. It uses an easy Click & Choose interface in a template that can be modified to your needs. There are only two steps to a program in Builder. All the items in step one must be completed before the items in step two can be started.
Builder Controls
![]()
Select COM Port
Select COM port chooses the computer COM port to which the Serial Interface Box cable is connected. The choices are COM 1, COM 2. On a Mac these are the modem and printer ports. The default is COM 1.
If you select COM 1 and the Serial Interface Box is connected to COM 2, the LEGO Engineer program will give an error. On a few PCís it can actually crash and quit when it tries to communicate with the Serial Interface Box. The Serial Interface Box communication occurs when programs are run, and when the LEGO Engineer has data to display on your screen. In the case of a crash, you will need to restart LEGO Engineer. After restarting, change your COM port setting and try again.
|
Communication Errors There is a good chance that you will get communication errors from time to time. The error message that appears helps to determine the likely causes of the error |
Things to check: More help is available on the internet at the following location: http://ldaps.ivv.nasa.gov/LEGOEngineer/ |

Click this button to run the program on the Serial Interface Box. (The Serial Interface Box must be plugged in and connected to the computer.)
Continuous Run Click this button to run your program in continuous loops instead of only once. |
Quit
Click this button to quit the builder programming environment and return to the main screen.
Help Click this button to bring up a help window. |
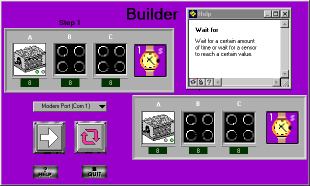
Help
This button opens a help window on screen.
When the help window is on you automatically get information about whatever the mouse cursor is touching.
Quit
This button quits the LEGO Engineer program.
Clicking on the "Quit" button will bring up a verification screen to confirm your choice. Quit will exit the program. Back will return you to LEGO Engineer.
Changing the Program
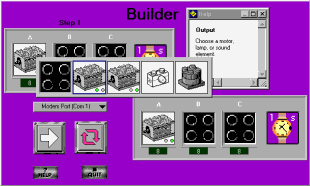 You can modify the Builder template to make your own program. Click and Choose new settings from the motor command menu and the length of step command menu as described below.
Output Commands
The output settings may be changed to make a motor rotate in one of two directions, turn on a lamp, or turn on a sound device. To do this, click on the picture of the motor and choose from the selections that appear in the menu bar.
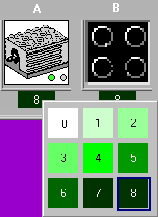
Note: selecting motors, lamps, or sound devices provides power to the
specified Serial Interface Box port, independent of what is attached to the
port. The numbers under the motors are power level indicators. 8 is the
maximum power level and 1 is the minimum power level. 0 is no power at
all. Clicking on the power level number shows the 9 power level choice
options. Move the mouse and click to choose the desired value.
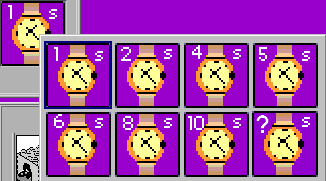 Duration (Length) of Task:
The duration for which the motor or lamp is on may be changed. To do this, click on the watch and choose from the time selections that appear in the menu bar. The choices are 1, 2, 4, 5, 6, 8, or 10 seconds. You also have the option of manually entering the exact amount of time (in seconds) for which the motor or lamp will be on.
Sensors can also be used to control the amount of time for which the motors are on. The Builder environment recognizes touch, light, angle, and temperature sensors. To use a sensor, click on its icon (located below the watch icons). The location of the sensor on the Serial Interface Box can be changed by clicking on the number above the sensor image.
The following are explanations of the sensor icons:
The touch sensor icon with the lit circle tells Builder to wait for the touch sensor to be depressed.
The touch sensor icon with the gray circle tells Builder to wait for the sensor to be released.
The light sensor icon with the lit background tells Builder to wait for the environment to get lighter.
The light sensor icon with the dark background tells Builder to wait for the environment to get darker.
The angle sensor icon with the circular arrow tells Builder to wait for the number of rotations to be greater than or less than some number (which you enter).
The angle sensor icon with the angle symbol tells Builder to wait for the angle (in degrees) to be greater than or less than some number (which you enter).
The temperature sensor icon with the letter F tells Builder to wait for the temperature in Fahrenheit to be greater or less than some value (which you enter).
The temperature sensor icon with the letter C tells Builder to wait for the temperature in Celsius to be greater or less than some value (which you enter).
When threshold values must be specified, a greater-than or less-than symbol and the value will be displayed below the sensor image. Adjust them appropriately.
Run Mode
Clicking on the run mode button runs the program in single execution mode. Clicking on the continuous run button repeats the commands over and over until the Serial Interface Box stop button or the LEGO Engineer Abort Step button is pushed.
|
Select this button to have the program run only once when the button is pressed. |
Continuous Run Select this button to have the program repeat continuously when the button is pressed. |
Builder Programming Exercises
The following exercises are designed to familiarize you with the basics of Builder. Work through this example first, to get a feel for the way a Builder program works.
Example: Connect a touch sensor to Port 1 and a lamp to Port C on the Serial Interface Box. Then, using Builder, write a program to light the lamp until the touch sensor is pressed.
Solution: In the Builder environment, Click & Choose to make your template look like the one shown below. Click the Run arrow to run the program. When the program runs, the lamp should remain on until the touch sensor is pushed in.
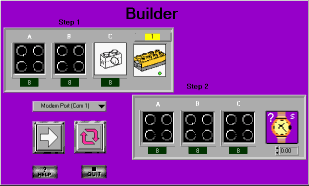
Now try the following exercises by yourself. Solutions are explained afterwards.
Exercises
Exercise 1: Start with the program and setup from the example above. Now connect a motor to port A. Rerun the program. Did the motor turn on? (It shouldn't have.) Now modify the Builder template so that the motor and lamp both turn on until the touch sensor is pressed.
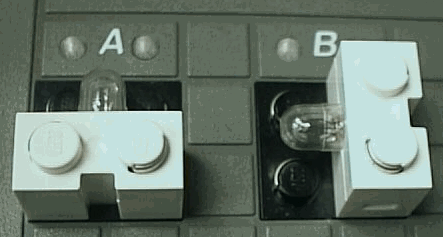
Exercise 2: Starting with the program and setup from Exercise 1, rotate the motor wire connected to port A by 180 degrees. Re-run the program. What happened? What happens when you rotate the lamp on port C by 90 degrees?
Exercise 3: Now connect motors to Ports A and C. Write a program in Builder that turns on the two motors, spinning them in opposite directions for four seconds. (Hint: Attaching a gear or wheel to each motor will help you see the direction of rotation.)
Exercise 4: Leaving the motors hooked up, plug the touch sensor back into Port 1 and put a lamp on Port B. Now write a program that performs the following task:
Turn on the lamp and the motors, rotating in opposite directions. When the touch sensor is pushed in and held down, the lamp turns off and the motors reverse directions. The motors then continue to run until the touch sensor is released.
Builder Exercise Solutions
 Exercise 1:
Exercise 2: Rotating the motor connection 180 degrees reverses the direction of the
motorís rotation. Rotating the lamp connection 90 degrees prevents the lamp from turning on.
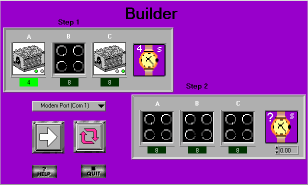
Exercise 3:
Exercise 4:
